Paw injuries are common in hunting dogs. Sharp terrain, harsh weather, and intense activity expose their feet to constant stress. Without strong, conditioned pads, even a short hunt can leave a dog limping. Cuts, abrasions, cracks, and burns happen often, especially in rocky or icy terrain. Dogs eager to keep going may push through pain, which can lead to worse injury.
Proper care before, during, and after a hunt makes all the difference. Prevention starts long before the hunt. Treatment in the field must be fast and clean. Recovery needs steady attention. Every hunting dog owner must know how to protect and treat their dog’s feet. A healthy paw means a capable hunting partner.
The guide below explains how to toughen paw pads, manage injuries on the spot, and avoid long-term problems.
Why Hunting Dogs Suffer Paw Injuries
Hunting exposes dogs to environments that challenge their physical limits. The paws bear the full force of movement, weight, and terrain. Every chase across rocks, ice, brush, or asphalt brings risk. Pads take the first hit and must act as armor. If unprepared, even short bursts across harsh ground can cause serious damage.
Types of Injuries Most Often Seen
1. Trauma Cuts
Sharp glass, metal, thorns, or broken branches slice the paw pads. These wounds usually bleed and may require stitches. They are often deep and painful.
2. Erosion Wounds
Rough ground wears down soft pads. Dogs not used to lava rock, stony beach, or dry gravel trails return with raw, sometimes bleeding paws. Erosion does not usually cut deep but takes time to heal.
3. Burns and Cracks
Hot pavement in summer and frozen ground in winter both burn. Icy water, snow, and salt eat into the paw surface. The result is cracked, dry, painful skin. These cracks invite infection fast.
Factors That Raise the Risk
- Soft lifestyle: Couch-dwelling dogs are not pad-ready for rugged field work.
- Overweight bodies: More pressure on the pads speeds up damage.
- Lack of exposure: Dogs raised on soft soil or grass need time to adjust to rocky or hard-packed trails.
- Poor nail care: Long nails catch on roots, rocks, and brush. They tear and shift pressure to weak spots in the feet.
Best Ways to Condition and Protect Paw Pads
Strong paw pads form through exposure, fitness, and care. No shortcut replaces real contact with different surfaces. Conditioning must start weeks before the hunting season. Protection comes next, with tools and habits that guard the paws once they face the field.
Conditioning Pads Before the Season
1. Start with pavement runs
Short jogs on sidewalks or gravel help thicken the outer pad layer. Begin with five to ten minutes and increase slowly. Spread out runs across different surfaces to trigger natural resistance in the skin.
2. Dry climates help toughness
Dogs raised or trained in wet regions develop soft pads. Move runs to dry trails when possible. Avoid damp soil or sand when building pad strength.
3. Keep the dog lean
Heavy dogs suffer more friction. Less weight means less pressure on feet. Feeding and regular exercise go hand in hand.
4. Use off-leash hikes
Controlled off-leash walking over mixed terrain helps improve balance and toughens pads. Choose rocky trails, forest floors, and dried creek beds.
Nail Maintenance Protects the Pads
Nails must stay short but not ground down to the quick. Long nails push toes upward and cause pads to strike awkwardly. This adds strain and increases the risk of abrasions or torn skin.
- Trim nails every two to three weeks.
- Use clippers or a grinder made for dogs.
- Get help from a vet if the dog fears nail trims.
Dog Boots and When to Use Them
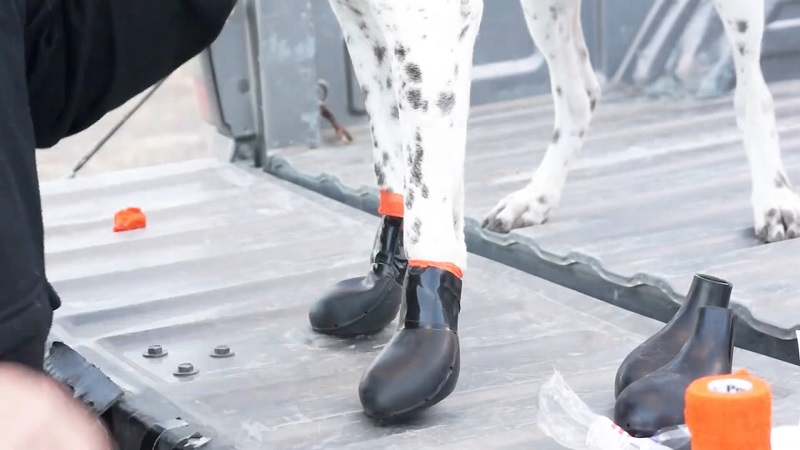
Dog boots prevent pad injuries but only if introduced correctly.
Introduce slowly
Start indoors. Let the dog wear the boots for a few minutes. Extend the time with each session.
Choose secure boots
The straps must hold tight but not cut off circulation. Fit matters more than the brand.
Expect resistance
Most dogs hate boots at first. Ignore the hopping, whining, or freezing. Keep moving. The dog will forget once the hunt starts.
Pad Balms and Protective Gels
Petroleum jelly or commercial pad balms form a moisture barrier. Apply a thin layer before walking over snow, ice, or hot pavement. Gels like Collasate or EMT Gel add healing support if the dog shows early cracks or redness.
Paw pad protection is not a one-time fix. It demands a cycle of exposure, care, and habit. The next section breaks down how to handle injuries when they happen in the field.
How to Handle Paw Injuries During the Hunt
Even with strong pads, injuries happen. The field holds sharp rocks, wire, thorns, and extreme surfaces. Dogs push past pain, so owners must stay alert. Early signs of limping, licking, or shifting weight mean action is needed. Quick field treatment keeps small problems from turning into major damage.
First Step: Stop the Hunt
Do not let the dog keep moving. Even if the injury seems minor, continued activity tears open cracks, deepens cuts, and spreads contamination. Catch the dog. Keep them still.
Field Care Sequence: Flush, Fill, Wrap
1. Flush the wound thoroughly
Use a plastic squeeze or spray bottle set to stream. Rinse with sterile saline or distilled water. Soap works in a pinch, but avoid alcohol or hydrogen peroxide. Remove all dirt, grit, or grass. Blot dry with sterile gauze.
2. Fill the wound with protective gel
Apply K-Y Jelly, Collasate, or EMT Gel. These block dirt and hair. They also reduce pain and add a barrier before vet treatment. Petroleum jelly works too, but sticks to fur and takes longer to clean later.
3. Wrap the paw gently but firmly
Use a non-adherent bandage like Adaptic directly over the gel. Add cotton or gauze for padding. Secure with Vetwrap or elastic tape. Avoid pulling tight. Always press tape against fingers placed between the wrap and the paw. Never pull tape directly around the limb.
Managing Bleeding in the Field
- Apply direct hand pressure for 5 to 8 minutes.
- Do not check too early. Let clotting finish before lifting the pressure.
- Use sterile gauze or cotton over the wound.
- Spurting blood means arterial damage. Apply pressure and transport to a vet immediately.
Special Care for Ear or Nail Injuries
Ear tips bleed heavily. Secure the ear flat against the skull with gauze and wrap the head loosely. Make sure two fingers fit under the neck wrap to avoid choking.
Broken nails often bleed and swell. Trim loose pieces only if safe. Wrap the paw. Use pressure and protect the area.
When Boots Help During a Hunt
Injury-prone dogs may benefit from boots after the first sign of wear. Once wrapped, a protective boot keeps dirt out and padding in place. Do not use boots without cleaning and bandaging the wound first.
Keep a Field First Aid Kit Ready
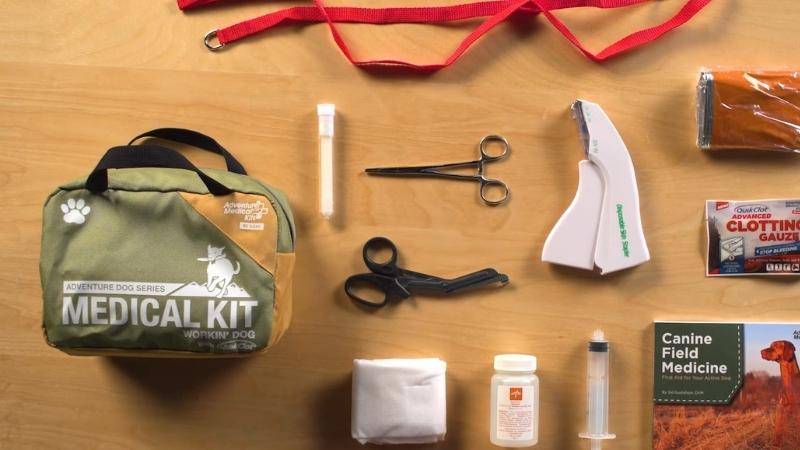
Every hunting trip should include:
- Sterile saline or distilled water
- EMT Gel or K-Y Jelly
- Adaptic bandages
- Cotton gauze
- Vetwrap or elastic tape
- Nail trimmer or grinder
- Scissors
- Booties (pre-fitted)
- Gloves and tweezers
Essential Aftercare to Speed Up Healing
Once the hunt ends, care does not stop. Even small paw injuries need steady attention. Pads heal slowly and stay exposed to pressure with every step. Aftercare must focus on cleaning, protection, and rest. Skipping steps now leads to long-term damage later.
Clean the Wound Again at Home
Even after field treatment, pads should be cleaned thoroughly in a controlled space.
- Rinse with warm saline solution.
- Use a syringe or spray bottle for directed flow.
- Pat the area dry with clean gauze.
- Remove any remaining debris using tweezers if necessary.
Do not apply alcohol or iodine directly. They delay healing and cause unnecessary pain.
Use the Right Topical Products
Apply an antibiotic ointment if the wound is open or at risk of infection. Neosporin works, but medicated gels made for dogs often heal faster and stick better. Reapply once or twice daily after each cleaning.
Protect cracked or dry pads with pad balm or petroleum jelly. Massage a small amount into the pad and allow it to absorb.
Bandaging at Home
Use non-stick dressing over the wound, covered by soft gauze. Secure with Vetwrap or elastic tape. Wrap snug but never tight. Watch for signs of swelling or numbness below the wrap. Change the bandage daily.
When and How to Use Paw Boots
Boots help protect the paw during recovery but only when the wound is clean and bandaged. Choose a boot with padding and a soft lining. Allow air circulation. Do not leave the boot on for more than a few hours without a break unless advised by a vet.
Control Movement to Avoid Reinjury
- Keep walks short and on soft surfaces.
- Avoid stairs, gravel, or pavement.
- Use a crate or confined space if the dog refuses to rest.
- Apply an Elizabethan collar if the dog licks or chews the bandage.
Monitor the Healing Process
Look at the wound every time the bandage is changed. Note any swelling, pus, odor, or color change. A healing pad becomes dry, firm, and slightly shiny. Redness or moisture may signal infection.
Healing may take 7 to 14 days depending on the injury. Deep wounds may need three weeks or longer. Do not rush the return to full activity.
When a Paw Injury Becomes a Serious Problem
Most paw injuries in hunting dogs heal with steady care. Some do not. Delay, infection, or deeper damage can turn a simple cut into a major medical issue. Owners must recognize warning signs early to avoid long-term harm.
Signs That Require a Vet Visit
- Swelling that spreads: Localized swelling is normal. If it moves up the leg or grows daily, infection is likely.
- Persistent bleeding: Bleeding that lasts beyond five to ten minutes after direct pressure needs professional help. Spurting blood means arterial involvement.
- Pus, odor, or thick discharge: These are signs of infection. Yellow or green fluids, bad smells, or sticky residue point to bacteria in the tissue.
- Worsening lameness: If the dog avoids putting weight on the paw after two to three days, joint, tendon, or bone damage may be present.
- Red streaks or fever: These may signal cellulitis or spreading infection. The dog may also become lethargic or lose appetite.
Long-Term Risks Without Proper Care
Paw injuries left untreated often lead to serious complications. One of the most common issues is cellulitis, a deep tissue infection that spreads through the soft layers beneath the skin. The area around the injury becomes hot, swollen, and painful. Without early intervention, the infection may reach the bloodstream. Dogs with cellulitis often show increased limping, restlessness, and even signs of fever. Antibiotics are necessary as soon as symptoms appear.
If infection moves deeper, osteomyelitis may follow. This condition affects the bone itself. Healing becomes extremely difficult. The infection can cause the bone to weaken, which may lead to fractures or joint dislocation. Dogs affected by osteomyelitis may appear lame, withdrawn, or even avoid using the limb completely. In these cases, X-rays and long-term treatment are often required. Recovery is slow, and in some cases, may not fully restore the function of the paw.
Severe or neglected injuries can also result in permanent damage, including loss of a toe or full paw. Long-term infection destroys both bone and tissue. In some dogs, the only option becomes surgical amputation.
Last Words
Hunting dogs rely on their paws for every task in the field. Speed, balance, and endurance all depend on healthy, hardened pads. Without proper care, even minor injuries can sideline a capable dog for weeks or longer. Prevention starts before the first hunt, with steady conditioning and weight control. Nail care, pad exposure, and the right gear all reduce risk before the dog ever leaves your side.
Field care must be fast, clean, and complete. Every hunter should carry the tools to flush wounds, apply protective gel, and wrap injuries correctly. Once the dog returns home, healing takes time and attention.
Dogs give everything in the field. Owners must match that commitment with smart care. Strong paws keep hunting dogs sharp, confident, and ready for every chase.